Do you aim to take amazing shots of products or food and then promote them on social media? Do you need good images for your Facebook ad or Instagram ad?
You don’t always need to invest in an expensive DSLR camera. You can still achieve professional photography with nothing but a smartphone.
It’s not an easy endeavor but we’ve got a few tips to help you get started. Keep on reading our list below to learn more:
Using the Grid Feature
Practice using the Rule of Thirds. This refers to a technique where you apply a grid on the lens viewer. You must align your subject on the intersections or lines of the grid.
Doing this helps build better image composition and blocking. You’ll learn how to guide people’s eyes naturally to your subject or a photo’s point of interest. It also guarantees that you don’t put your subject in an awkward area of the shot.
The good thing is you don’t have to imagine where the lines of the grid are. Most phones nowadays have the option to apply a grid, making it easier to use the Rule of Thirds. Until you can use this technique without assistance, don’t hesitate to activate the grid feature on your smartphone.
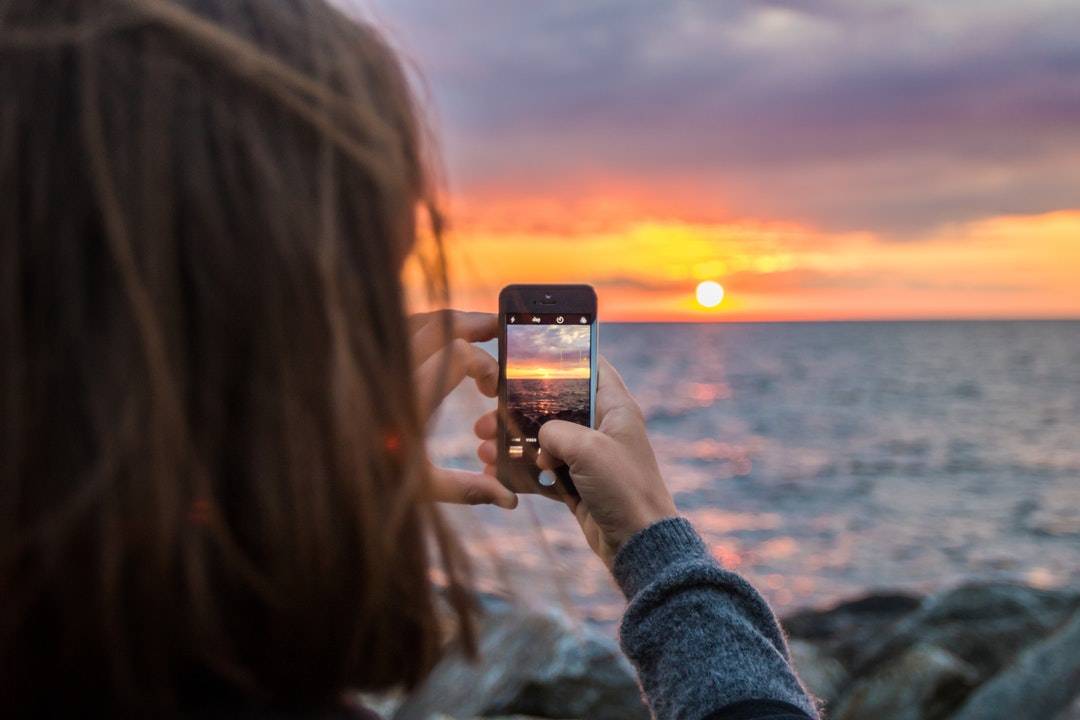
Golden Hour for Natural Light
Don’t fret if you don’t have a bunch of studio lights and rigs to hold them up. You can still get away with natural light. The trick is to know when to take shots.
Professional photographers use natural light during the golden hours. This refers to the time right after sunrise begins and right before sunset. If you time it right, you’ll get naturally warm, golden light which looks great in photographs.
There isn’t a set time for the golden hour. It all depends on your location, the weather, and the current season of the year. It’s always a good idea to check the weather report and find out what time sunrise and sunset begin so you can prepare as early as possible.
Your phone’s lenses might react to warm light differently compared to others. Keep trying and find out the right level of exposure to take good pictures.
Don’t Zoom In
Even with the best phone camera, the quality of images you’ll get will never match what a DSLR or mirrorless camera can produce. One of the main issues holding smartphone photography back is the size of the lenses. There are some workarounds for this problem but zooming in is not one of them!
The built-in camera for most smartphones can take great images at a certain distance. When you zoom closer, the lenses have to rely on digital enhancement to expand the image. Unfortunately, this can make a shot visually noisy with a lot of grain and pixelated subjects.
You have two solutions to get around this problem. Either get closer and bring your camera in to take the shot you need or use external lenses. We’ll tackle the benefits of using lenses below.
Master your phone’s capabilities. Take shots of people and memorize the optimal distance when taking wide shots, medium shots, and close-ups.
Control the Light
Anyone can take amazing and professional-looking photos with the right light. Unfortunately, mastering lighting for photography isn’t something you can pick up in a day or two. You’ll need to invest in the right gear and then practice for months or even years to get good at it.
Start by learning the basic lights needed for photography. Learn what a key light is and then study backlights and fill lights. Learn how to use reflectors, diffusers, and fabric to control the strength and direction of your lights.
One of the best ways to control light is to eliminate natural light first. Get blackout curtains and use boards to block sunlight coming into a room. Once it’s pitch-black inside, turn on your artificial lights and play around with the way they affect your subject.
Keep in mind that a smartphone isn’t as powerful as a DSLR. You’ll need bright lights to truly get the most out of your shots.
Network and Learn
Photography might seem like a hobby you’ll do by yourself but it doesn’t have to be that way.
Don’t be a stranger! Take advantage of things like the like4like hashtag and join their social media groups so you can interact with more smartphone photographers.
Network with other smartphone photographers and invest in smart marketing opportunities to keep learning. Discover their techniques and listen to their tips. Check out their portfolio so you can gain better insight on how to take unique shots or discover new ideas.
At the very least, networking will motivate you to keep learning and continue practicing.
Take a look at their portfolio and list down images you can try to replicate. This will teach you how to control light and take advantage of your phone’s capabilities. Afterward, try to use those techniques on your subjects and see how it affects your images.
Take Advantage of Negative Space
Let your subject breathe. You don’t have to fill every inch of the shot with something interesting. Smartphones already have a disadvantage due to the limited technology so don’t ruin a shot by overstuffing it.
Create engaging content through smart use of negative space. This is the same technique used by web designers and people who make advertisement images in posters and banner ads. They want to draw your eye towards something, so they use negative space to eliminate distractions.
Negative space refers to empty portions in your frame. If you have a subject on the right side of the frame, don’t put other things on the left side. Those additions will distract a viewer’s eyes, meaning they might not notice or pay attention to the photo’s main subject.
This is where you’ll need to master your phone’s camera. Learn how to distance it from a subject to avoid capturing unnecessary visual noise.
Don’t Use Social Media Camera Apps
If you want to take great pictures on your phone and post them on social media platforms, don’t use the built-in camera apps! The camera apps on Instagram and Facebook, for example, reduce the quality of your shots. Even with the right lighting and composition, your photograph won’t look as good as it should be.
You can use the default camera app on your phone if you use a high-end device like the iPhone 13 or Samsung Galaxy Note 20. However, if you have a low to mid-range smartphone, it’s better to download a professional camera app instead. These apps come with better features, ensuring you can take higher-quality photographs.
With the right app, you can adjust the white balance, color correct, and alter the shutter speed or aperture of your phone camera. You still won’t get DSLR-quality photographs but the level of control will improve your shots. People with an untrained eye for HD images might not even recognize the difference.
Use an External Lens
The lens built into smartphones can get a lot done. This is especially the case nowadays since most high-end smartphones feature more than one camera lens.
The iPhone 13, for example, comes with three lenses. This includes the wide lenses, ultra-wide lenses, and the telephoto lenses.
However, you shouldn’t limit yourself to these built-in options. What if you want to take HD images of something really far or very small?
The solution is to use external lenses. These are lenses you can attach to your phone and place on top of the built-in camera. You can find anamorphic lenses for smartphones, macro lenses, and lenses for a fish-eye effect.
You don’t have to download an app or synchronize the lenses with Bluetooth. It’s as easy as attaching them to your phone to alter how your device takes photographs. Buying new lenses should be a priority if you want to take smartphone photography as a serious hobby.
Take Dozens of Photos at a Time
Whenever you take photos, don’t settle with the one great shot you have. Take dozens of images at a time. For every good shot you take, you may have a few great shots that you can use in your reel.
Doing this also ensures you have backups in case the image you thought was great turned out to be a disaster. What if the shot was good but there was a person or animal who zoomed into view at the last second? By taking extra shots, you’ll have one of similar quality but without errors.
Having a lot of extra shots also guarantee you’ll find an alternative to your main image. You might have a shot that surprises you with its beauty and composition. It’s always a good idea to go through your reel and look for hidden gems.
Angles and Depth-Of-Field
List down a bunch of standard angles. This includes traditional close-ups, wide shots, ultra-wide shots, panorama shots, and birds-eye-view shots. List down some shots you rarely see, such as a worms-eye-view or a Dutch angle shot.
Grab your phone, lights, and a subject. Practice taking pictures of the same thing using all these different angles and distances. Experiment with angles and try mixing concepts to come up with unique pictures.
Learn how to use the features of your phone’s camera app or the external lenses you bought. Play around with the depth-of-field and check the full extent of your phone’s aperture.
Use a Tripod With Gimbal
Always keep in mind that even steady hands can tremble. This becomes quite an issue the moment you have to take multiple shots of the same subject and from the same angle. The good news is you don’t have to hold your phone all the time.
You can use a tripod instead.
Not only will a tripod eliminate blurriness due to movement, but it will also offer consistency when you need to take the same shot over and over.
But why stop with a traditional tripod? Tripods are great for stability but they don’t offer much when you’re on the move. You’ll need something better if you intend to take photos while jogging or driving.
Fortunately, there is something for this very dilemma: a tripod with a gimbal. A gimbal stabilizes your device, ensuring it doesn’t jostle around while you’re moving. Shaky hands, walking, driving, or going over bumps won’t cause sudden jerkiness that could ruin a shot.
Use a Lightbox
Ever seen social media posts of food or products in an all-white background? These are great shots to advertise an item. This is also the kind of shot you’ll need in case you plan to sell products online.
How do photographers achieve this kind of clean, bright image? The answer is to use a lightbox.
A lightbox is a pure-white cube with foldable sides. Many lightboxes come with built-in bright LED lights. You can get more bang for your buck by purchasing external lights too.
Lightboxes eliminate shadows and provide a clean stage for your photographs. This can significantly help a smartphone camera since all the light makes it easier to take high-quality images. There won’t be much visual noise either.
Can’t buy a lightbox? You can make your own using white foam core panels.
Practice Professional Photography With Your Phone Now
Now you know how to get good in professional photography even with a regular smartphone. Take more control over lighting, practice different techniques and angles, and always listen to the advice of expert photographers.
That said, taking good photos is only the beginning. You also need to learn how to use photo editing tools and how to discern whether you took a good shot or not.
Of course, we offer more than photography guides. Pick up tips and tricks for dozens of different fields and topics right here!