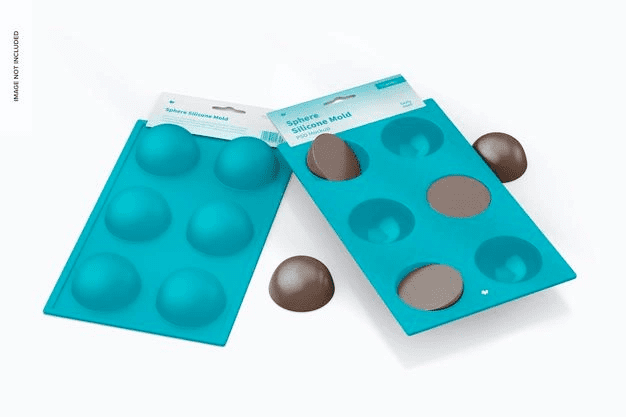
Delicious molded chocolates are easy to make when one knows how to use a chocolate mold. Using chocolate molds makes chocolate making easy, especially for beginners helping them achieve the perfect shape. In this writing, we will discuss how to use a clear plastic mold to create beautiful and tasty chocolate desserts.
How to use a chocolate mold
Using a chocolate mold could be tricky often. Assuming the right amount of chocolate comes with practice. However, the first things that one will do when using chocolate molds are a chunk of chocolate, a piping bag or spoon and of course, a mold.
How to fill a chocolate mold
Fill all the cavities of the chocolate mold with melted chocolate of your choice; try not to overfill the cavities; the chocolate must not come over the edge. Once one has filled up all the cavities in the mold, tap the mold gently on any surface for releasing the air bubbles from the melted chocolate, bringing the bubbles to the top.
Insert mold into the refrigerator; chocolate generally takes around 10 to 20 minutes to become hardened in the fridge. Smaller chocolate molds might take a lesser time to set, and larger ones are going to take the full 20 minutes (because of the quantity of the chocolate).
Removing the chocolate chunks from the mold
See the opposite side of the mold. Is it cloudy and white? If yes, the chocolate candy has hardened and has begun to release away from the mold, and now it’s ready to be released! Does the mold still look pressed and wet on the flip side?
The chocolate might need a little more time to harden. Once they have hardened, carefully flip over the chocolate mold onto a clean surface or paper towel. Keep the mold near the workspace (no skydiving chocolates!) and give them a slight tap on the opposite side, if they won’t release it right away.
If one has any trouble getting chocolate to remove molds, they could place the mold in the freezer for five more minutes. Sometimes it requires extra cold!
White streaking or dull finish
Molded chocolates should not not have a beautiful shine, but if they must also not be looking dull a little. It could be as the chocolates will need a little more time in the refrigerator if it is. Even though they might look hardened, sometimes they will need just a little longer. Can you see white streaks?
White streaks appear when the candy melts have become a little too hot during the melting. This separates the fats of the chocolates, creating a streaky finish. To fix this, try to remelt the chocolate and stir it a little extra.
What do I do to add colours to my chocolate?
You can pour melted candy directly into the cavities with a plain design having little to no detail. When working with a more detailed design, or if one wishes to add various colours to their chocolates, fill a clear piping bag with melted chocolate (of your choice), or any excess chocolate one might be having on hand.
Cut a small hole from the tip of the piping bag. Piping the details is going to allow one to control where they are placing the candy—keep in mind to let all the colours dry prior to placing another colour on top.
How can I add nuts at the centre of my candy?
To achieve the traditional salty-sweet combination of nuts in your chocolate dessert:
- Melt the chocolate as instructed above.
- Place the melted chocolate in a decorating bag and now fill all the cavities half full.
- Tap the mold to allow the bubbles to escape, and then add some nuts in each cavity of the mold.
- Fill the other half of the cavity with more chocolate.
- Tap the mold again, releasing the
- and place the mold inside the refrigerator until set.
How do I add filling to my candy?
To make chocolate desserts with a delicious caramel or creamy centre:
- Fill each cavity of the mold lesser than half full.
- Now use a decorator’s brush for painting the sides to the top edge of the cavity until you are able to see no light through them.
- Cool the molds for a few minutes, allowing the candy to set.
- Fill every cavity with the filling of your choice, but ensure that it’s room temperature or cooler—a hot filling can ruin all the hard work.
- Leave around 1/8 inches below the edge. Now top off the rest with melted chocolate.
- Tap the mold on any surface releasing air bubbles, and chill to set.
When removing the chocolates, if it doesn’t quickly remove, chill the molds for a few extra minutes until the opposite side of the mold looks fully frosted over.
How to prevent the chocolate from sticking to the mold?
Chocolate naturally has a bit of fat in its makeup. Since this is the scenario, it is unnecessary to grease chocolate molds when making candy, as one does with pans when baking cookies or cakes. The main reasons chocolates get stuck to the candy molds are moisture, molds that are not completely clean, or too warm. Chocolate candies should be completely tough to pop out of the molds cleanly.
Step 1
Wash the candy molds entirely at least once a day in advance of you’re planning on using them. Dry them with towels. Allow the molds to air-dry overnight to ensure no moisture or foreign substances (such as remnants of past candy making) on their surfaces.
Step 2
Pour the chocolate that you have melted into the molds as you do. Make sure to pour the chocolate only into the cavities, not on the plastic parts between the molds.
Step 3
Refrigerate the chocolate molds until the chocolate in the cavities has completely hardened. Gently pop the chocolate-free by pressing on the molds from the flip side. Please keep your hands off the chocolates as much as possible to prevent melting them with the warmth of the hands.
Summing up
Looking forward to making delicious chocolate desserts for your loved ones? We hope this article is going to help you do that. Make sure you are following all the steps stated above to make tasty chocolate treats.
My name is Sardar Ayaz a professional content writer and SEO expert having Proven record of excellent writing demonstrated in a professional portfolio Impeccable grasp of the English language, including idioms and current trends in slang and expressions. I have ability to work independently with little or no daily supervision with strong interpersonal skills and willingness to communicate with clients, colleagues, and management.
I can produce well-researched content for publication online and in print, organize writing schedules to complete drafts of content or finished projects within deadlines. I have 12 years’ experience to develop related content for multiple platforms, such as websites, email marketing, product descriptions, videos, and blogs.
I use search engine optimization (SEO) strategies in writing to maximize the online visibility of a website in search results